Sign in
Sign in
The system is available at the address indicated during the implementation and launch of the system. A detailed address can be obtained from the HR department. The demo version of the system is available at: demo.sscmaster.com.
Just type in your email address in the login field. Either upper or lower case can be used, so you can enter the address without paying attention to the size of the characters.
Startup password
The starting password was sent to your email address during the account registration. The first time you log in, the system will ask you to change it and set your password.
In the password change window, after clicking the icon ![]() located in the upper right corner you can read guidance describing the requirements that your password must meet.
located in the upper right corner you can read guidance describing the requirements that your password must meet.
Your password must contain at least:
– 8 characters in total
– one numeric digit included
– one lowercase letter included
– one capital letter included
– one special character out of the list: !@#$%^*()”_+| {}:”<>?~’-=[];,./’
NOTICE:
– the password change is forced every 90 days automatically
– the app stores up to 12 of your latest passwords
Locking of your account
Password reset
If you lose or forget your password, you have the option to run a password reset procedure. To do this, click on the reset password button and enter your email address.
After completing the entry, click the reset password button ![]() .
.
The successful email verification results in sending you the email guiding the further steps.
After clicking the link provided, you can enter your new password.
The password change procedure properly performed is confirmed by a green color message displayed at the bottom section of the window. The screen then switches to the main application page.
NOTICE:
The password procedure link can be used once only, repeated attempt results in displaying the red color message, and the screen switches to the procedures start page.
The link is valid for the limited time of 1 hour only, the later attempts result in displaying the message.
Dashboard
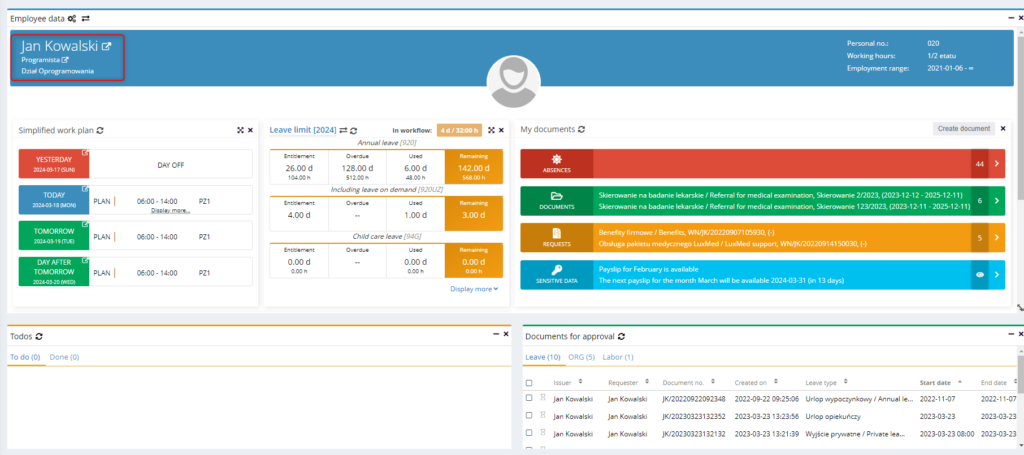
Employee data
Basic user data is displayed at the top of the home screen.
You can open the employee’s profile by clicking on the ![]() icon next to the name. A similar icon next to the job title opens the employment document.
icon next to the name. A similar icon next to the job title opens the employment document.
On the right side you will find additional employee data:
– personal number
– working hours
– employment range
The profile photo can be changed by clicking on the icon symbolizing the camera. Just select the suitable image file and confirm with the OPEN button.
The size and position of the selected part of the photo can be easily adjusted by moving the frame.
The simplified work plan
SIMPLIFIED WORK PLAN displays work hours scheduled for:
– one day back
– the current day
– two days ahead
Leave limit
Another component contains leave limits by type:
– annual leave
– including on-demand
– for childcare
The component header displays the total hours from pending requests.
Overtime
The OVERTIME component reports the number of compensated overtime and remaining to be compensated. It summarizes them monthly and within a given settlement period.
Click DISPLAY MORE to view detailed statements.
My documents
The MY DOCUMENTS component provides quick access to data in a few sections.

The ABSENCES section provides the relevant documents and their statuses and includes leave and sickness absences.

The DOCUMENTS section stores files related to the employee, such as contracts, annexes, certificates, and medical certificates.

The REQUESTS section stores documents and their status in terms of insurance, benefits, certificates, and much more.

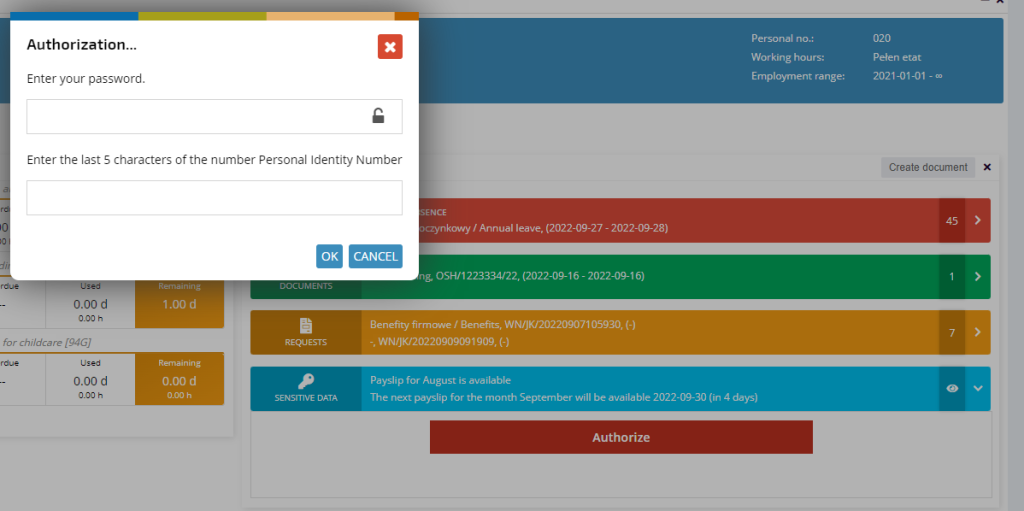
The SENSITIVE DATA section allows you to download a payroll slip, PIT, or RMUA. Access to this section requires additional authorization using the SSC Master application login password and the last 5 digits of the employee’s PESEL number (in the case of a person without a PESEL number – the last 5 digits of the passport number).
How to create documents
In the header of the MY DOCUMENTS component, there is a button that allows the employee to create a document
Change the displayed employee data
If you have the accsess rights to do so, you can change the user whose document details you want to display in the Dashboard. Click the arrow icon.
Select an employee from the list.
The data of the indicated employee will be displayed on the Dashboard.
Sensitive data
The section on SENSITIVE DATA is located in the MY DOCUMENTS component. It contains:
– Payroll slip
– PIT
– RMUA

This section displays information about documents ready for downloading and dates when you can expect the next ones.

To access sensitive data, you must undergo an additional authorization process. Click the ![]() icon, enter the application login password and the last 5 digits of your PESEL number (or passport in case of foreigners), and confirm with the OK button.
icon, enter the application login password and the last 5 digits of your PESEL number (or passport in case of foreigners), and confirm with the OK button.
If you are employed in a few positions, you can easily switch between them by clicking the button.

NOTE:
The displayed buttons reflect the availability of each document. If you are working your first calendar year, PIT DECLARATION will not be available.
The button ![]() allows you to select the month of your work and the related settlement.
allows you to select the month of your work and the related settlement.
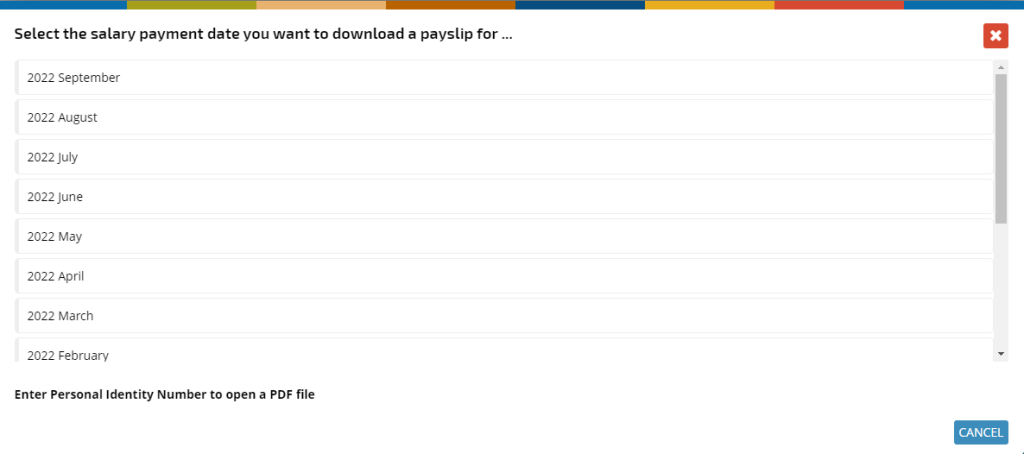
PDF files with a salary slip are additionally protected by password: your PESEL number or passport in the case of foreigners. Enter and confirm your password.
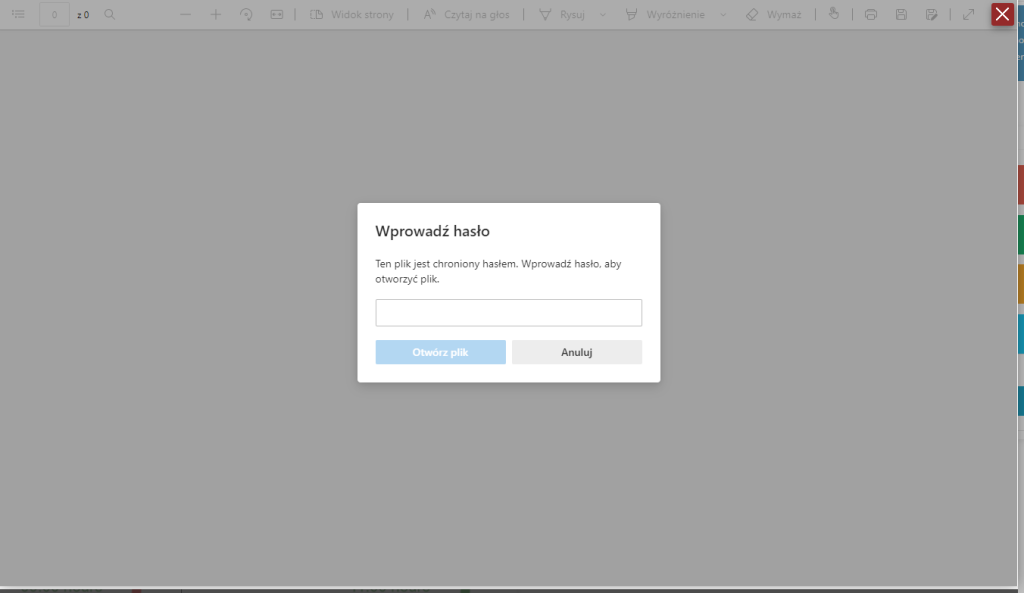
You can download the salary slip to your device by clicking the arrow icon ![]() or print it by clicking the printer icon
or print it by clicking the printer icon
If there are more documents for a particular month, the bottom bar will show the number of documents and a button to toggle them.

You can similarly download other documents. To download your PIT declaration, click the button ![]() and select the year to which the declaration applies.
and select the year to which the declaration applies.
Enter the password (your PESEL number or passport number if you do not have a PESEL number) into the file and confirm it.
If you want to download the RMUA (monthly report for the insured), click the button
![]() and select the appropriate year. Like in previous documents, the file is secured by a password, which is your PESEL number (or passport number, in the case of people who do not have a PESEL number). Enter the password and confirm it.
and select the appropriate year. Like in previous documents, the file is secured by a password, which is your PESEL number (or passport number, in the case of people who do not have a PESEL number). Enter the password and confirm it.
If you want to log off from the sensitive data, click the ![]() icon.
icon.

Automatic logout from the sensitive data occurs after 5 minutes.
Calendar
In the Calendar section, all user documents in the calendar layout are displayed. The user can individually select the data to be presented on the calendar.
To change the type of data presented, select the icon ![]() and indicate the appropriate range of data.
and indicate the appropriate range of data.
For the Birthday event (if this feature is run on the system), you can indicate a specific set of data that has been assigned to you and that you want to display on the calendar:
– MY -> the default option, it displays your birthday date only;
– By permission – displays the birthdays of people you have the proper access rights to (e.g. if you’re a direct supervisor);
– Own sections/My departments – displays data regarding employees from your department;
– Other sections/Other departments – displays the data regarding people assigned to departments that have been assigned in the user permission configuration;
– All – displays all employee data, regardless of user permissions.
Employee Management
Employment document
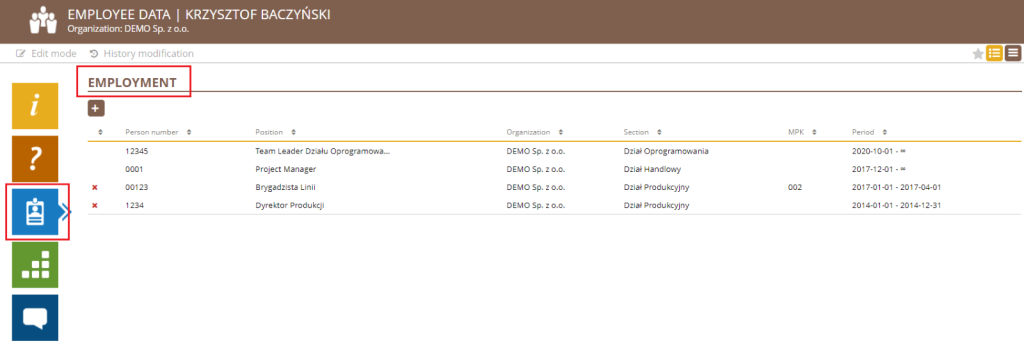
The employment document describes the details of the employee’s employment details and conditions in the position. An employee can be employed in several positions within an organization. Employment detailed data is displayed in the employee profile.
and from specially prepared views in the application, presenting employment documents by different criteria.
Archival employment documents (those in which the end date of the cooperation, which is in the past) remain in the application creating the full employment history of the employee.
Employment document description
The SSC Master ORG module shows all active employment documents in the Employment view.

The employment document consists of the following tabs:
- Basic data – This section contains employment basic data
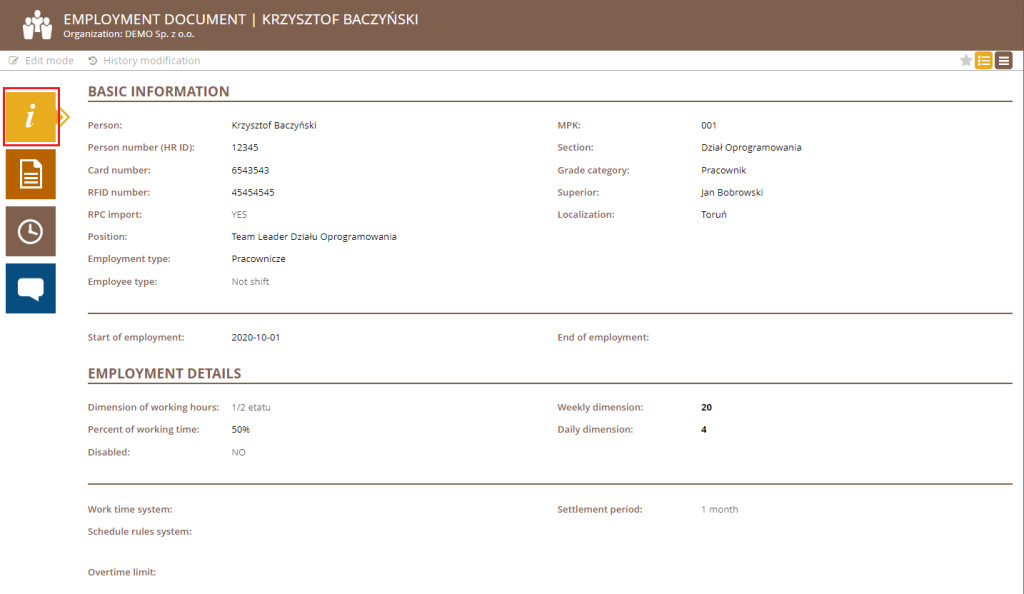
Person – Employee’s name (sourced from the profile),
Personal No. (HR ID) – unique HR number of the employee employed in a given position, the field is used to bind various data and elements in the system,
Card No. and RFID Number – employee card number authorizing the working time registration,
RCP Import – This field specifies whether the employee will use the factual working time registration or not. This field is also used for integration with RCP I/O readers. YES to be set when the employee is to record the factual working time and NOT otherwise,
Position – the name of the job position in which the employee is employed,
Employment type – the type of job position in which the employee is employed,
Employee type – employee type: shift or non-shift,
CC – the place of the employee’s grade,
Department/Section – the department to which the employee is assigned,
Grade category – employee grade, there are two options available: Employee or Contractor,
Superior – the employee’s direct supervisor, the person having access to all the data regarding the employee,
Location – the physical location of the employee during the regular work operations,
Start of employment – start date of employment,
End of employment –termination date of employment.
– Employment details: This section contains details related to the working time and mode.

Working hours – the employee’s working time,
Working time percentage – the percentage of working time, the value displayed depending on the selected working hours,
Weekly working hours – number of working hours per week, the value displayed depending on the selected working hours mode,
Daily working hours – the number of working hours per day, the value displayed depending on the selected working hours mode,
Disability – to be marked if the employee is disabled. Marking the field with YES reduces the daily work hours limit to 7 and is calculated accordingly for the different working hours records,
Working time mode – type to be selected from the list,
Scheduling rules system – a scheme of the rules for the employee schedules creation
will be created. The default system configuration contains a rule scheme defined for office work, it allows you to create other schemes.
Overtime limit – text box to enter the number of overtime hours. The information-only value is NOT concerned within process of scheduling and accounting for working time,
Billing period – the billing period of the employee concerned, the parameter involved in the overtime settlement process,
– Related documents – the section contains documents related to a specific employment document:
Leave limits: The tab contains details related to the employee’s vacation limits for the year. In the vacation limits dimension field, you can set up a default vacation dimension for the user, the values entered in these fields are sourced to the vacation limit document for that year. If you uncheck this box, the default values defined will be sourced to the holiday limit document (the defaults are set to Vacation – 26 days, Leave on demand – 4 days, Childcare – 2 days). The data entered in the vacation limit document is always processed concerning the working time and dates of employment.

Only one vacation limit document (marked in green) is active in the app at a time.
The vacation limit document displays as shown below.

You can create new vacation limits in two different ways:
– from the employment document level

– from the holiday limits view

Absences: The tab lists all absences related to the employment document.

– Employment data history – This section contains a history of changes to the employment document.

Working time planning and settling
Schedule – basic informations
The user’s schedule consists of 3 tabs/sections:
– Master data – the tab contains all the basic data of the schedule.

– Details – the tab contains detailed data related to the plan and settlement of working time.
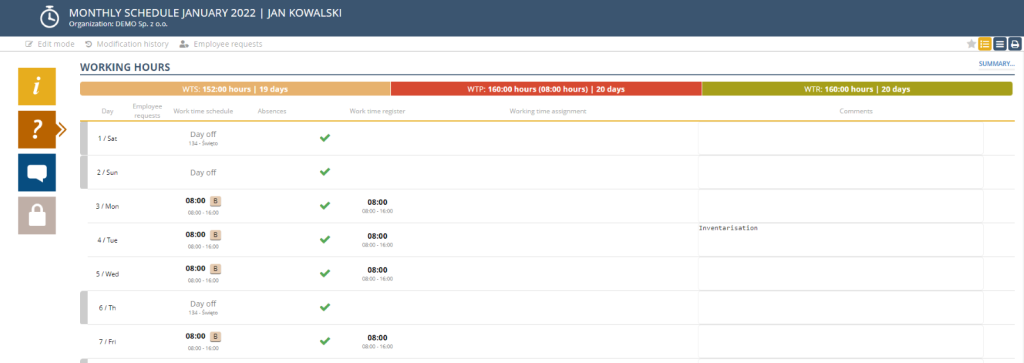
– Comments – on this tab you can add comments and additional files related to a given schedule.

Recording of real working time
Registration of actual working time in the web application
Recording of actual working time in the mobile application
Leave requests
How to create a leave request
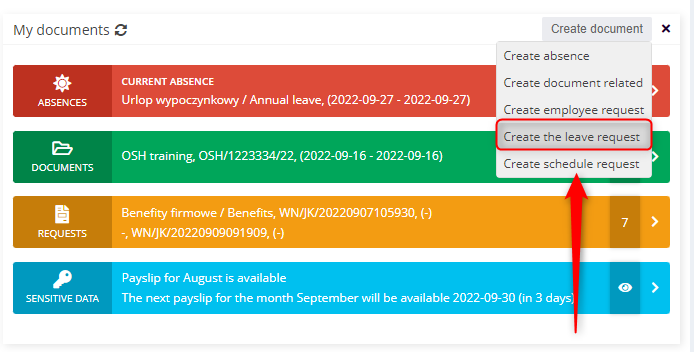
If you wish to create a new leave request click on ![]() icon located on the top bar of the LEAVE aplication or CREATE DOCUMENT item in MY DOCUMENTS and select CREATE LEAVE REQUEST.
icon located on the top bar of the LEAVE aplication or CREATE DOCUMENT item in MY DOCUMENTS and select CREATE LEAVE REQUEST.

Choose a proper leave type from the list.
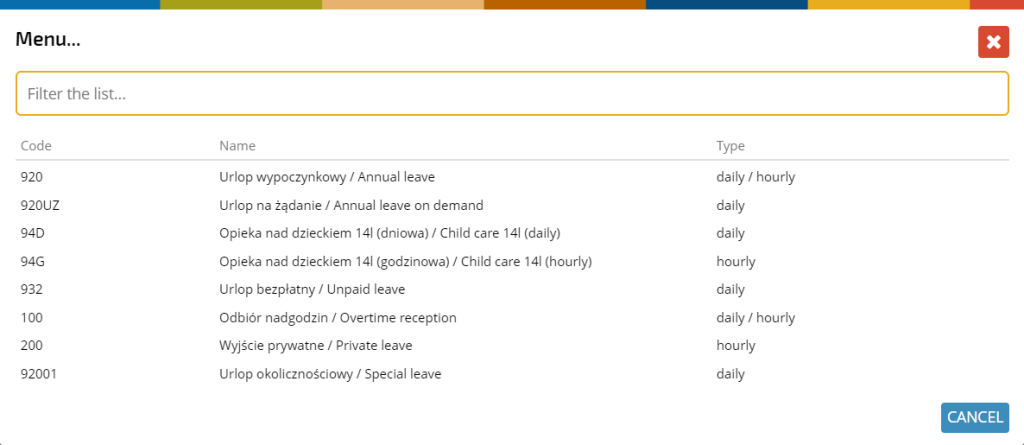
After indicating a specific type of leave (absence), a full leave request form opens, which contains the following data:
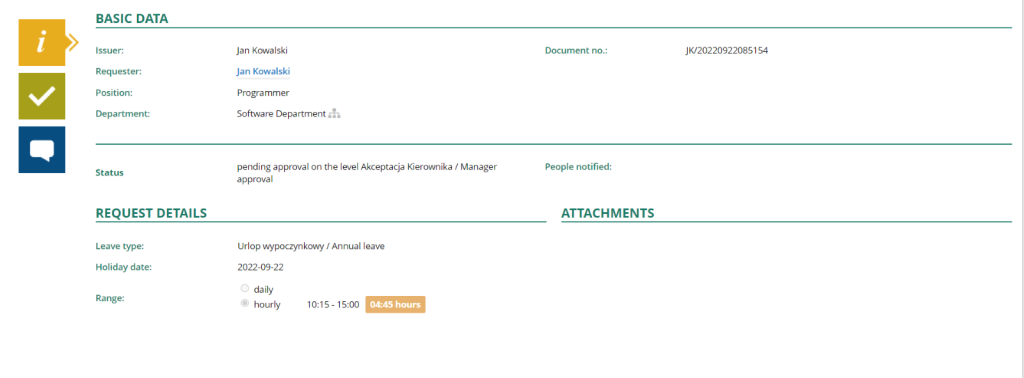
NOTE: If you want to submit an request on behalf of someone else, click the REQUESTER link
and select a person from the list.

From the request level, you can quickly check your current leave limit balance; click the LEAVE LIMIT button on the right side of the screen.
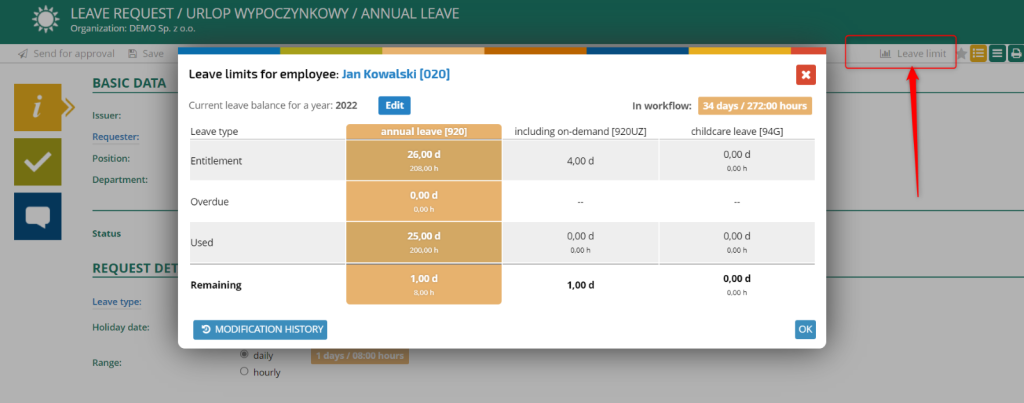
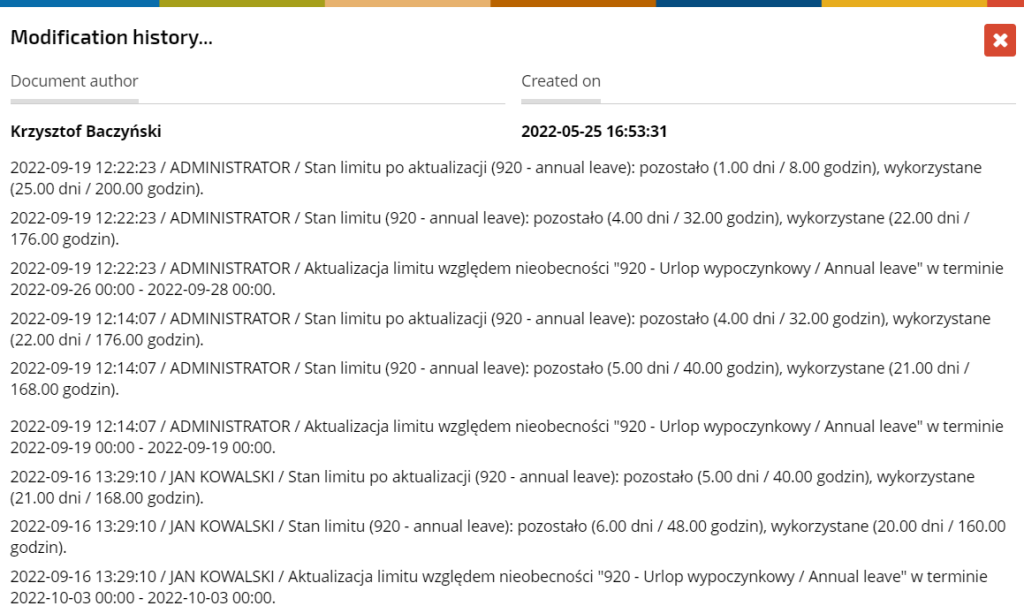
With the button ![]() you can open the full history of changes to vacation limits.
you can open the full history of changes to vacation limits.
The colored icons lead to the tabs:
– basic information
– approval path
– comments and attachments
Select the start and end date of the leave in the REQUEST DETAILS section.
Click the SEND FOR APPROVAL button in the upper left corner of the screen.
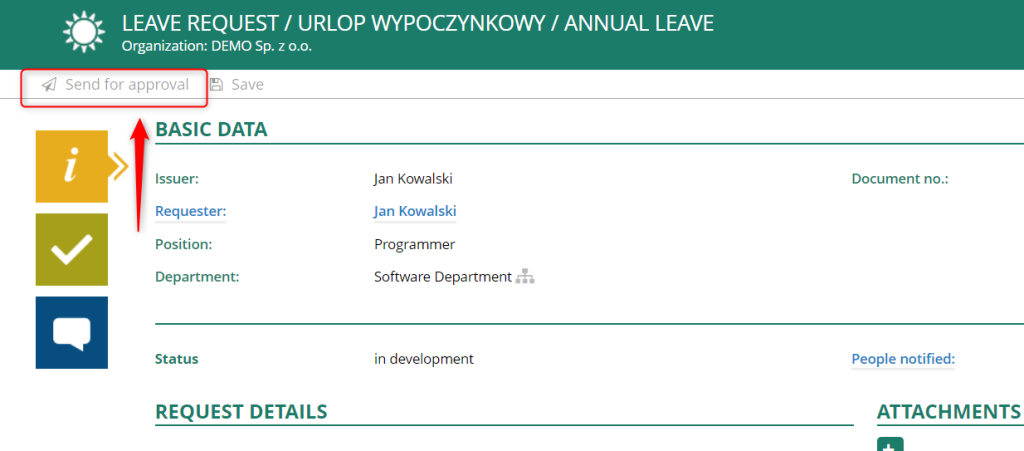
Your request has been correctly submitted and is pending approval from the supervisor. The system will automatically redirect you to the employee portal (dashboard).
When sending a request for approval, the system checks the availability of the leave limit. If the user does not have enough leave days, a relevant message appears and the request cannot be sent.

REMEMBER:
Your leave limit will not be updated until your manager approves your request.
Withdrawal and modification of leave request
Employee requests
Employee requests
How to submit an employee request
To submit a new employee request, click on the ![]() button and select the type of case you want to apply for.
button and select the type of case you want to apply for.

You can also submit an employment request from the employee portal (dashboard) select CREATE EMPLOYEE REQUEST from the CREATE DOCUMENT menu in the MY DOCUMENTS component.
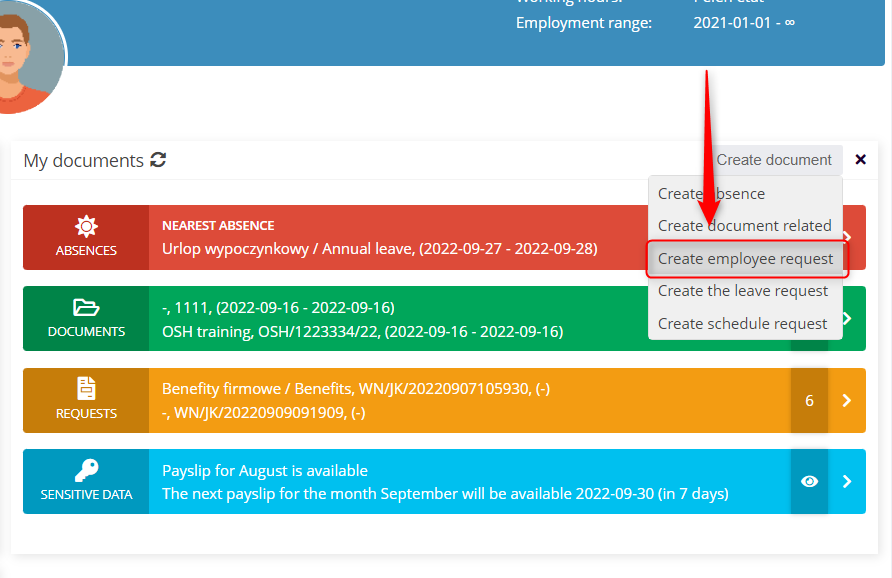
Select the appropriate request from the list.
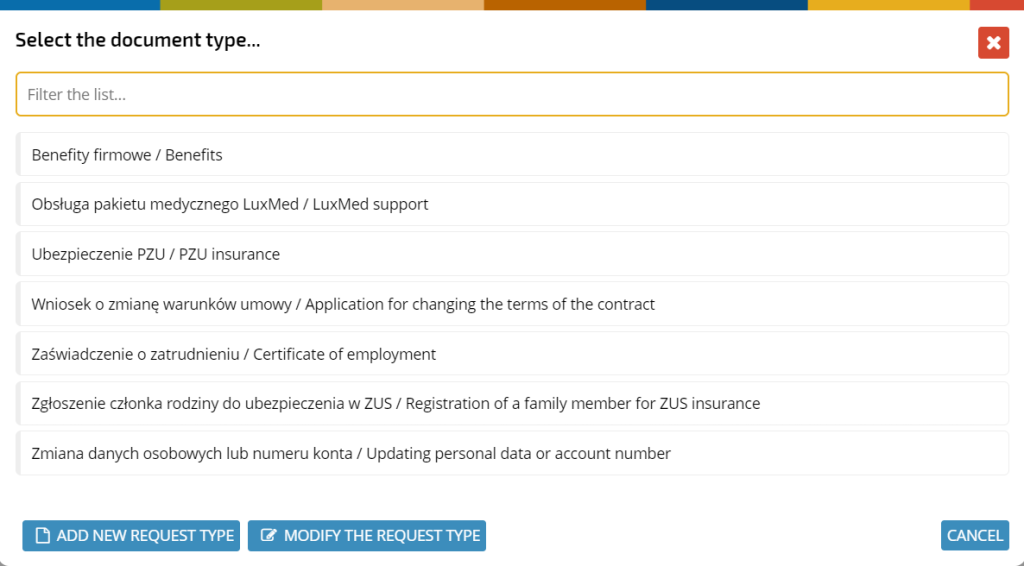
In the text area in the DESCRIPTION section, write the purpose of the request or use the ready-made suggestion.

Read the instructions for completing the request.

If the purpose of your request involves obtaining a document (e.g. an employment certificate), the request is ready and you can send it for approval.

If you are submitting a request that requires you to submit a form or other document as an attachment, find a ready-made template in the DOCUMENT TEMPLATES section, download it, fill it out and add it to the attachment. Click ![]() , select the appropriate file and confirm with the OPEN button.
, select the appropriate file and confirm with the OPEN button.
The request is now ready and you can send it for approval.
You can find a list of your requests in the MY DOCUMENTS component in the REQUEST section.
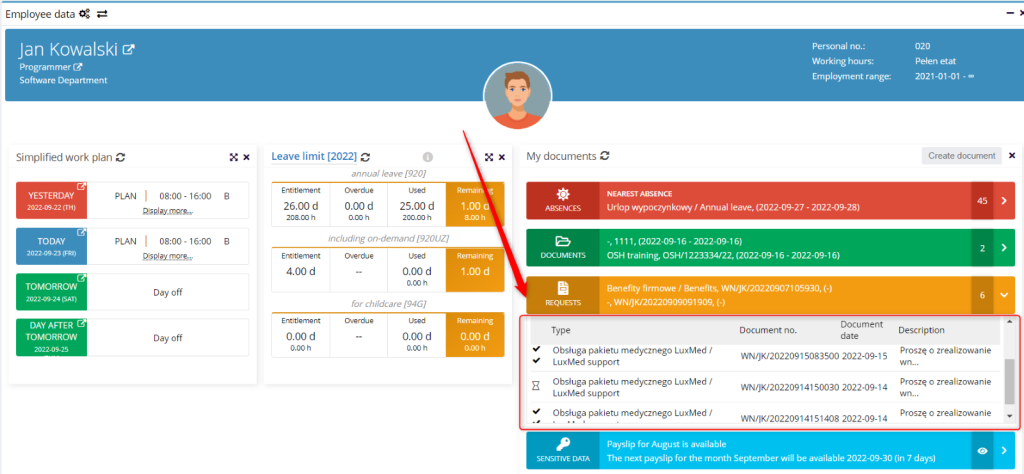
Or in the ORG application view. Click the ORG icon in the side menu. In the path in the top panel, select REQUESTS, ALL, TYPE.

Overtime request
How to submit a request for overtime
An overtime request can be created in two ways:
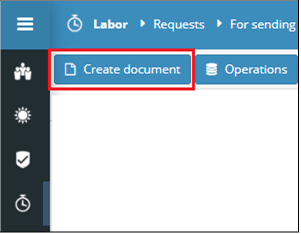
– from the requests view in the LABOR application

– from dashboard
To add an overtime request, open the MY DOCUMENTS section and select CREATE SCHEDULE REQUEST.
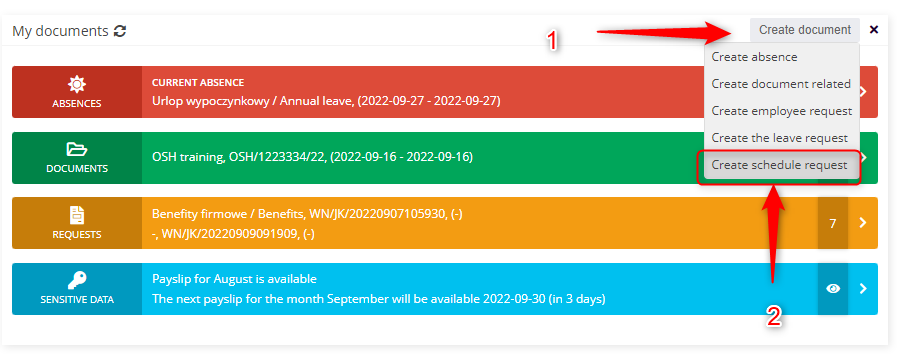
Select the right request type.

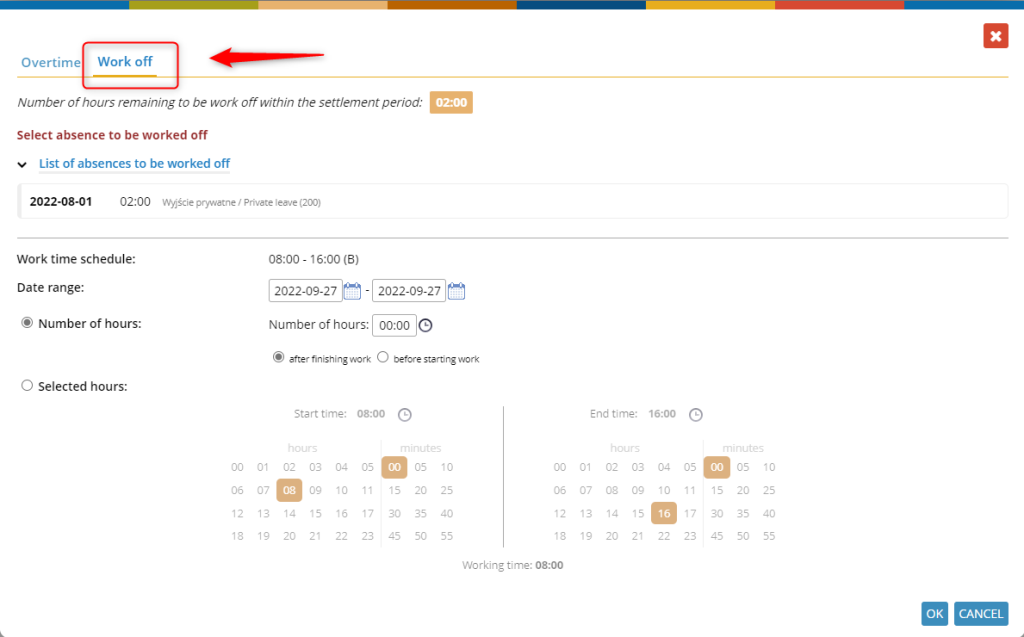
The request for work off and the overtime request are related, which means that you can request overtime and work off absences in one request. The form of request is similar, in the data selection window just use the first tab OVERTIME for the overtime request.
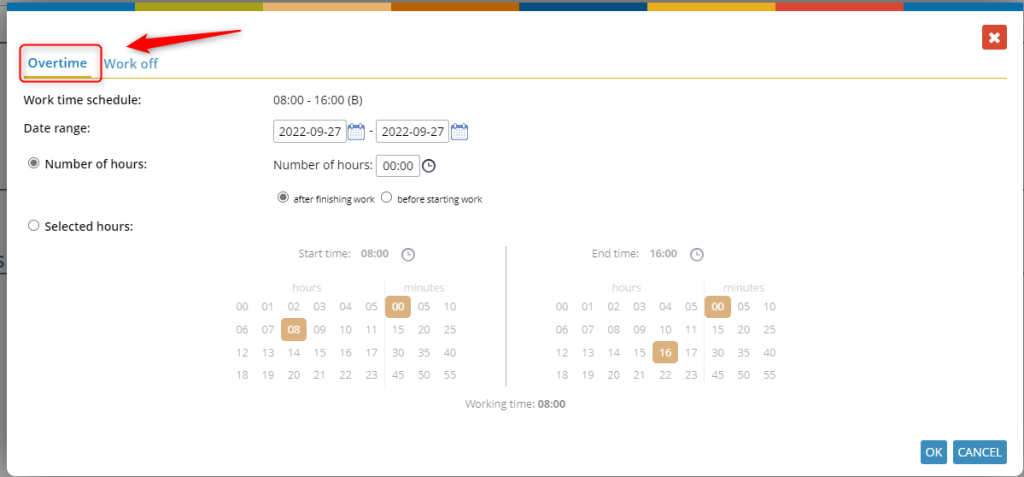
Or a second tab WORK OFF for the request to work off an absence.
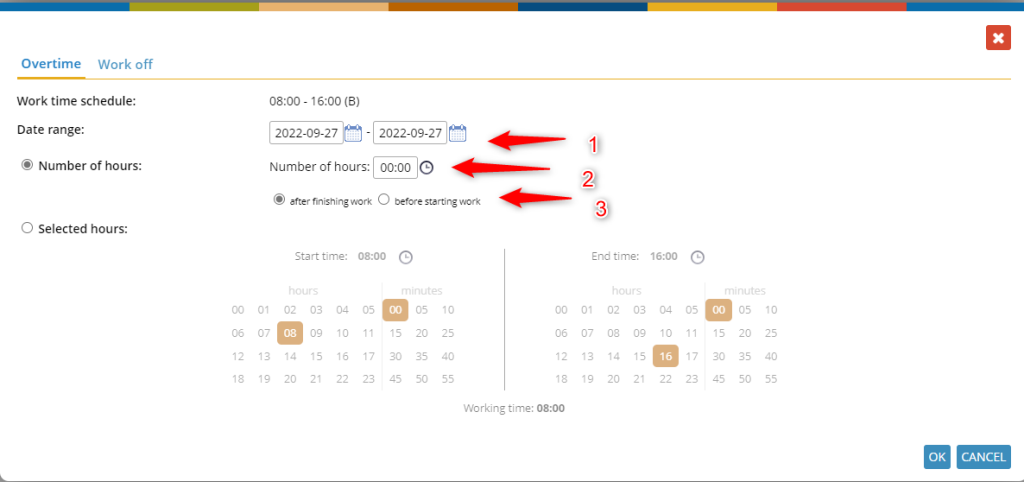
Select the days on which you want to schedule overtime. Indicate the number of additional hours in the selected time frame. Specify whether you want to work the extra hours before the start of the scheduled hours or immediately after them.
After confirmation, a table with the following information is generated:
– selected days
– work schedule
– range
– number of hours
– direct supervisor
– comments

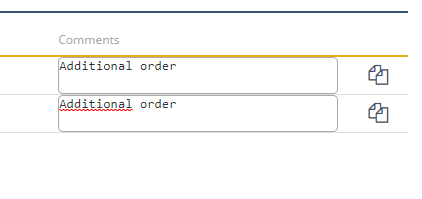
If you want to add an overtime request on the same day before work, or after work, copy the corresponding line. Click the card icon, enter the appropriate date and select AFTER FINISHING WORK or BEFORE STARTING WORK. Type a comment for each day.
The completed form can be sent for approval.
You can find an instructional video about submitting a request for overtime at the link here.
Request for the use of overtime
How to request for the use of overtime
To generate a Request for time off in exchange for overtime work, from the absences view, click on the NEW ABSENCE button.
You can also submit a request from the employee portal (dashboard). Select the CREATE THE LEAVE REQUEST from the CREATE DOCUMENT menu in the MY DOCUMENTS component.
In the selection list, indicate the appropriate type of absence, in this case – Overtime compensation.
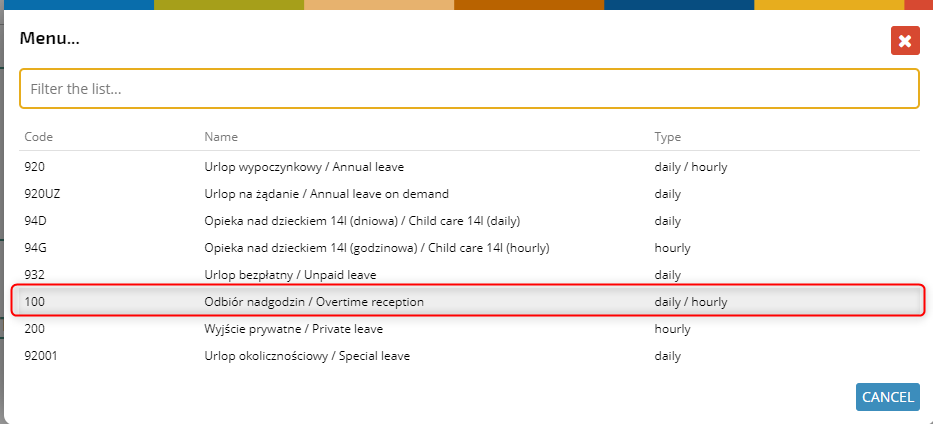
Then indicate on whose behalf you can create a request for overtime collection, the application allows you to create a request:
– At the request of the employee
For 1 overtime worked, the employee is entitled to 1 hour off. Therefore, when applying for a day off in the amount of 8 hours, you will settle for 8 hours of overtime.

– At the request of the employer
For 1 overtime worked, the employee is entitled to 1:30 hours off. Therefore, when applying for a day off in the amount of 8 hours, you will settle for 5:20 hours of overtime.

Regardless of the form of request chosen (at the request of the employee or the request of the employer), the further processing of the request is the same.
After generating the request, the system will display a list of overtime possible to compensate in the selected time range

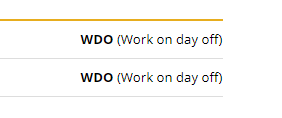
In the case of full-day pickups, the system proposes to pick up the so-called “mid-week” overtime (with the annotation WORK ON DAY OFF).
If you want to request compensation for several hours (incomplete working day), under RANGE, select the HOURLY variant and specify the range of hours to be covered.

In this case, the system will display daily overtime.
NOTE: When an hour range is selected, overtime worked on a day off is NOT displayed in the list.
Each time you change the dates or times in the Scope section, the system recalculates and indicates the list of available overtime.
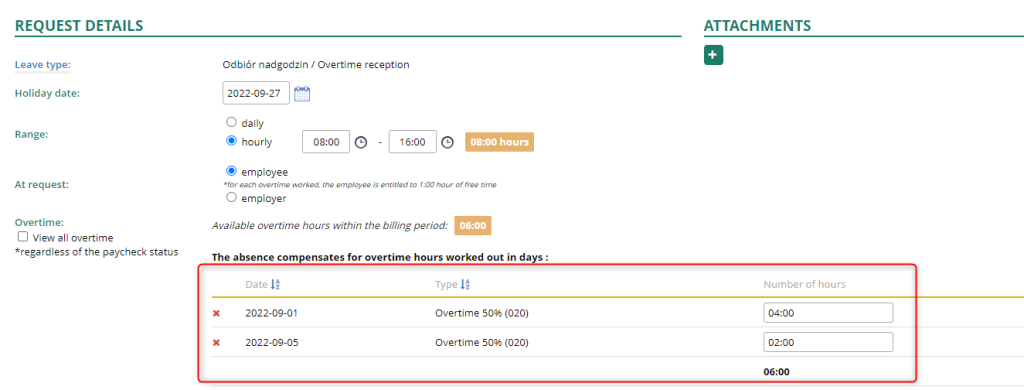
The OVERTIME item displays the number of overtime hours available in a given settlement period and the number of days to be compensated for work on days off.

The request is now ready, and you can send it for approval.

You can find an instructional video about overtime compensation at the link here.
Working off an underwork
How to request working off an underwork
A request to work off an underwork can be created in two ways:
– from user dashboard:
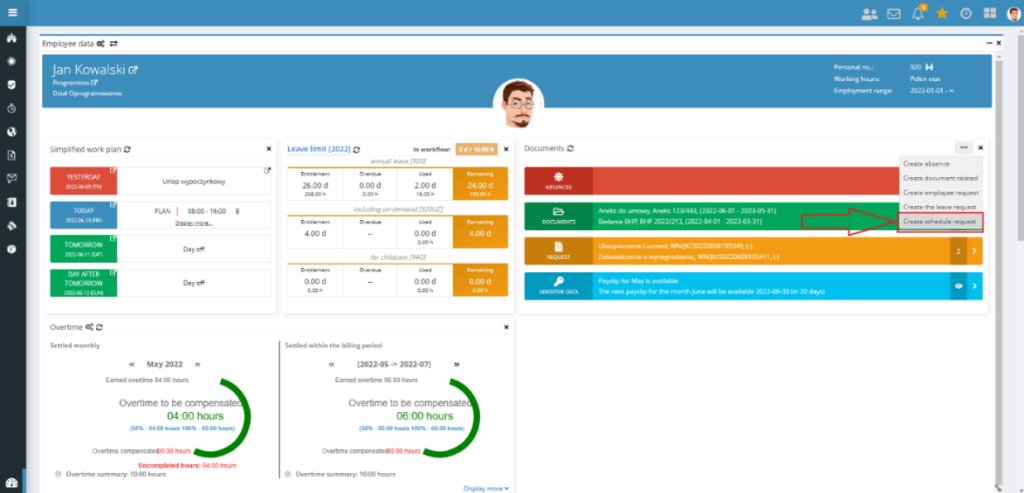
– from the Requests view in the Labor application
In the next step, indicate the appropriate type of request: OVERTIME & WORK OFF

Once you have selected the type of request, a form will appear where you will need to fill in the specific details.

If an employee requests on his/her behalf, then automatically, after selecting the type of request, a window will appear, in which you define which underwork he/she will work off. If the request is created by a manager, click on the button to indicate the persons for whom such a request is being created, and only in the next step indicate the relevant elements of the work-off.
To indicate the absences to be worked off, go to the second tab: WORK OFF
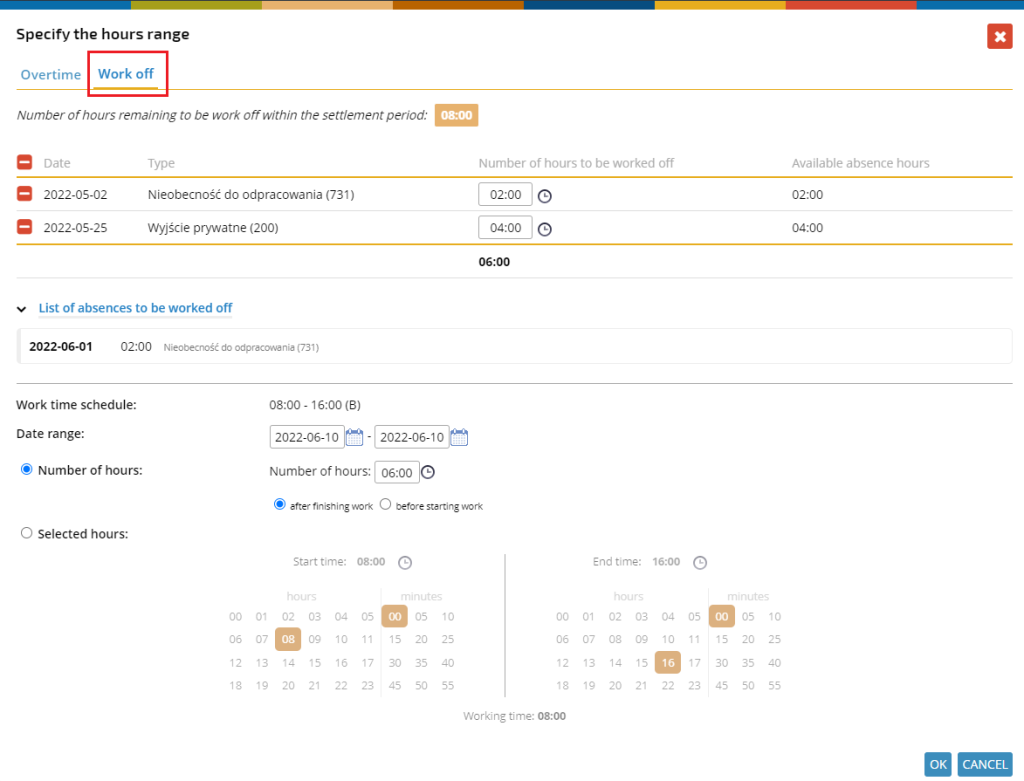
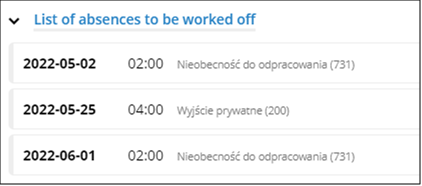
Then, select the absences you want to work off from the list.
The list of absences includes only those under-worked absences, that have not been worked off or have not yet been scheduled to be worked off (the request to work off must be approved).
The indicated absences will be shown in the table.
NOTE: If you have scheduled a work off that you did not complete (you did not stay longer at work), then the missed shift will appear back in the pool to be worked off. The operation will be performed by the system automatically on the next day after the scheduled redo date.
Example: An employee, two hours of his/her private leave from 02.06.2022, scheduled to work off 03.06.2022. The scheduled work-off was not completed, so the underwork (2 hours of private leave from 02.06.2022) will be returned to the pool to be worked off on 04.06.2022.
In the next step, you should indicate the day, on which you plan to work off the selected absences. The system will automatically fill in the planned amount of overtime after you indicate a specific date. Similarly, as in the case of an overtime request, you can plan the number of overtime hours in two ways:
– By indicating the amount of overwork (without specifying a range of hours) and by specifying when they should be worked (after or before work).
– When indicating specific start and end times, be sure that the range of hours is “contiguous” to the scheduled work hours for that day.
After filling in all the necessary details, the request details are as follows:
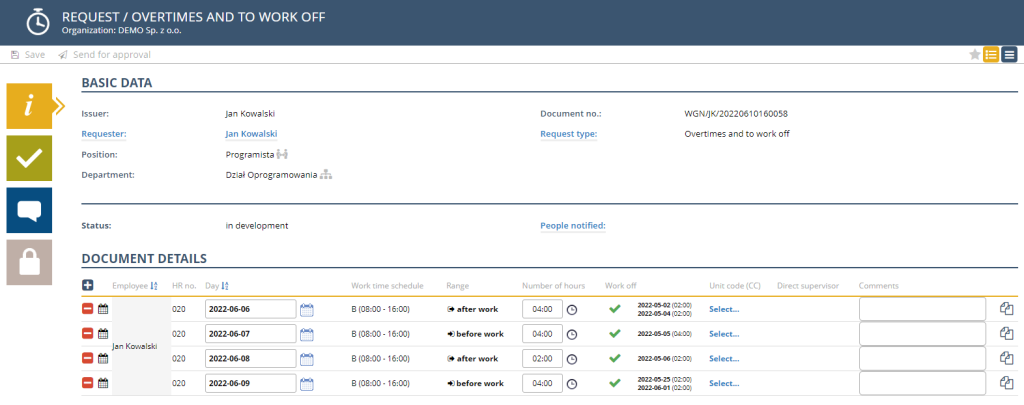
You can add a comment to each line by typing it in the COMMENTS column. The content of this field will be transferred to the specific row in the employee’s schedule to the Comments field with a note.
If you want to make corrections to already completed lines, just click on the “stylus” icon.
After completing all the necessary data, you can send the request to be approved by a higher-level supervisor. To do so, just click on the button ![]() located on the button bar.
located on the button bar.
You can find an instructional video about submitting a request for work off an underwork at the link here.


